BrainPOP and BrainPOP Jr.

BrainPOP, BrainPOP Jr., BrainPOP Espanol, and BrainPOP Francais are now available for grades K-8! BrainPOP creates cross-curricular content digital content that engages students and supports teachers including animated movies, student creation and reflection tools, learning games, interactive quizzes, and customizable assessments. For more ideas on how BrainPOP can be used in the classroom, click here.  


How do I access BrainPOP?
You can access BrainPOP through your Google waffle (click More at the bottom). On an iPad, go to brainpop.com. In the upper right corner, tap login. Then you can login with G Suite for Education.

How do I set up a class in BrainPOP?
If you use Google Classroom, you can import your entire class. If not, follow the directions listed below to create a class.

Teacher:
1. Log in to BrainPOP or BrainPOP Jr.
2. Click on My Classes (top left)
  • If you use Google Classroom, select Import New Classes. Select the class(es) that you want to import and Import Selected Classes.
  • To create a class, select New Class. Type your class name and create a class code.


How do students access BrainPOP?

Students should go to the BrainPOP website (brainpop.com or jr.brainpop.com). If accessing BrainPOP for the first time, students should follow the steps below to login using Google.

  1. Select LOG IN (top right).
  2. Click the G Suite for Education login option.
  3. Students should enter their Google login info if they have not already done so.
  4. At the next log in screen, DO NOT LOG IN! Instead, click Make a new account.
  5.  Click the I have a code button and enter the class code provided by the teacher.

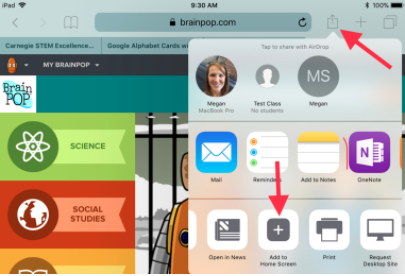
Students can add BrainPOP to the home screen of their iPad by logging in to either BrainPOP or BrainPOP Jr., tapping the share button, and selecting Add to Home Screen. This will create a  shortcut to the website that looks like an app on the iPad’s home screen.
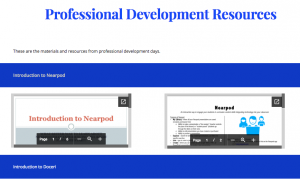
Explore!
You can search topics or click on a subject area. Everything you find can be assigned to students. Get a quick introduction to all the different activities by clicking on the slides presentations for BrainPOP and BrainPOP Jr. The slides give a quick preview and then the speaker notes expand on each feature.

There is so much on BrainPOP! BrainPOP Educators will help you get started and learn more ways to enhance student learning. If you need help navigating, getting your students set up, or ideas on integrating BrainPOP into your classroom please contact your tech integrator.

Google Expeditions – Virtual Reality

Field trips can be challenging and hectic to plan – transportation, permission slips, and chaperone’s… oh my!

Google Expeditions has opened up the world for field trips and does not require any of those fine details of field trip planning.  With over 200 expeditions created, we can take our students almost anywhere on Earth.From a wastewater treatment facility to the settings of Shakespeare’s plays, Google Expeditions can be used to enhance any curriculum.

Virtual Reality (VR) has been all the rage lately in both entertainment and in education. Visit any store where video games are sold or attend any education conference and you’re likely to see VR headsets.

The official Google Expeditions VR headsets are available through the Instructional Media Services of IU13. These are available to be checked out on a first come, first served basis to any individual who attended the training at the IU. Megan, Melissa, and myself all attended this training and are able to sign out the viewers for you and work with you. 

If you would like to sign out the viewers and use them in your classroom, please contact your Tech Integrator Specialist and have a flexible schedule in mind. We are able to sign the set of 30 viewers out for a week, but depending on availability, you may have to choose a different time frame. 

Side note: Steve Mellinger from the Middle School library and Matt Davis from the High School Social Studies department have been trained as well, but are limited in their schedule to bring these viewers to your classroom; they can, however, be an excellent resource for ideas in integration.

BUT – you DO NOT HAVE to use the viewers.

We can connect to Google Expeditions using the iPads we already have! Connecting through our iPads, the lesson will be readily available without sign ups or additional equipment.

No matter which way you choose to connect to Expeditions, you as a teacher Guide, will be provided with a pre-written script in the app describing the location you choose, along with questions to pose to students.

Some Tips:

  • Check out the research on using VR in classrooms. Common Sense Education has some great resources including a Virtual Reality 101 video as well as an article that includes research-based ways to use VR for learning purposes.
    Abridged version: Small increments of time are best, be aware of possible motion sickness (students should take the googles off and take a break if this occurs), only provide experiences that you would want your students to experience in real life
  • The teacher script is written for secondary classrooms, but since the teacher is the only person viewing the script, it can be adapted for younger students.
  • When planning your Expedition, you’ll want to budget time for students to “ooh” and “ahh”.
  • Unless you have a large and open classroom space, encourage your students to stay in their seat and move around in their chairs. I’ve seen Explorers wander about and unknowingly walk into a chair or desk.
  • Allow time for reflection. At the training, Adam Geiman (Elementary Technology Coach at ELANCO School District) shared his template of the See, Think, Wonder activity he created for his students as a reflection of their travels. It is particularly interesting to hear the students’ Wonder section after an Expedition.
  • Talk with us! We are happy to help you explore, plan, and implement Google Expeditions in your classroom.

Winter is Coming and so are more iPads

Throughout this year, we’ve been following the vision of Manheim Township Mobile Learning Committee: that students are engaged in an innovative curriculum that, through the strategic use of technology, empowers them to control their learning and development by fostering the essential skills of critical thinking, communication, collaboration, and creativity (the 4 C’s). Since September, we’ve seen students in grades 3, 5, 7, and 9-12 begin to dabble in the 4 C’s with great success!

Grades K-2, 4, 6, and 8…now, it’s your turn!

The original plan was to implement a two year roll out process, but this November the board approved the motion to expedite the second phase.

What does that mean?

The iPads will be delivered, unpacked, barcoded, charged, and set up in the next few months. Then in late January/February 8th grade and 6th grade iPads will be delivered, with grades K, 1, 2, and 4 to follow by the end of winter.

Prepare for Winter

The Cup of Tech Website provides loads of resources. Two tabs to pay attention to for professional development purposes are Township Tech Tools and Professional Development Resources.

Township Cup of Tech Website Tool bar


Township Tech Tools

This page contains links that will bring you to Tech Media’s website. Tech Notes- Tips, Tricks & News from the World of MT Tech will call attention to any news Tech Media would like you to know. Still having trouble figuring out the World of Google? Google Resources and Tutorials contains links to explain how to use Google applications like Gmail and Google Calendar. Township Techy Tutorials relates tools covered in PD sessions to the 4 C’s: Collaboration,Communication, Critical Thinking, and Creativity.Cup of Tech- Tech Media Links


Professional Development Resources

Here you can find professional development resources from sessions held this past summer along with a few held at some buildings this year. This page has information on Nearpod, Doceri, iPad Basics, Google, Social Media, Coding, iMovie, Writing, Assessment tools, and more. As Technology Integration Specialists continue to hold sessions we will continue to add to this page.

Cup of Tech Professional Development Resources Page


Upcoming PD

In December the District will continue to learn more about incorporating Digital Citizenship into teaching with the help of Common Sense Media. Technology PD will continue as we run into our March PD days. This year is “Year 0” as everyone (teachers and students) experiment incorporating technology into daily teaching. You can start small: pick 1-2 apps or ways the iPad can make a beneficial impact in your instruction for the remainder of the year. As the year progresses you will grow more comfortable, so that next year you can start off strong with iPads in your students’ hands.

Using Flipgrid to Increase Engagement and Collaboration

Flipgrid is a great App or web-based tool to help increase engagement and collaboration in the classroom. It has taken the message board and discussion forum to new heights by allowing students to post brief videos of themselves to your class grid.

One benefit of Flipgrid is that it is easy to use in both the teacher and student format. Also, the free version has enough features that will allow you to experiment to shake up a lesson.

I was recently invited into J. Brad Landis’ health classes at the High School for an observation of Flipgrid. He only recently started using Flipgrid and his students in the classes I observed were brand new to using the app. I have to add this disclaimer before I go much further: Brad independently purchased the full version of Flipgrid that offers additional features. For more information on pricing click here

Brad’s introduction to the assignment pointed students to the fact that the world is changing and the way business is run on a daily basis is changing: more companies are relying on apps/websites such as Facetime, Skype, or Zoom for virtual meetings or webinars. It is becoming more likely that you would run or take part in a meeting using a device than flying across the world for a meeting. He stressed that it is important to become comfortable talking more professionally to a camera (using it beyond the silly selfies and Snapchat videos).

This was not a brand new lesson that Brad designed for the sake of using iPads in the class, but rather one that had been used in the past that he felt could use some added engagement and collaboration. Students were learning about LGBTQ issues and were prompted to respond to an assigned scenario. There were various scenarios the students were hypothetically placed in that would require them to make a decision while being sensitive to LGBTQ students.

Students in the past had logged onto the class Moodle page, open up the word document, and started typing away at their responses. They would then submit that word document to Moodle for Brad to download and then read individually as an audience of one.

In this new version, Brad used Flipgrid to have students respond to these scenarios via video and post them to his class grid. Students were instructed to create a two minute video and then respond to two other classmates. They were told their responses needed to add depth so that it  can drive the discussion. Students were also required to find an on-line resource to help back their opinions.

Change can be sometimes be difficult and scary. Brad recognizes this and says, The challenge was trusting the process; using a new web 2.0 tool, learning while the students were learning, the quality of their responses, and how I would assess all the responses.”


When using the Flipgrid app, it looks like the photo below from the student perspective. As students create their videos, the screen becomes filled with student videos. (Brad’s assignment is now up to 27 responses, 31 replies, 349 views, and 11.2h engagement!)

 Modifying this assignment from a single student response to an outlet that can drive conversation increases student engagement, allows for collaboration between students, and offers an opportunity to work  on communication skills. Brad reflects on this lesson and his use of Flipgrid in saying, “My favorite part about modifying this lesson is the excitement on the kids’ faces to use technology in a new way.  No longer are they tethered to the classroom.  Students can spread out around the HS first floor (common area by art room, cafe lobby, and cafe) to complete the assignment.  Doing this takes away some of the formality and allows the students to relax, creating more authentic responses.”  
If you’re interested in using Flipgrid to modify a lesson, please don’t hesitate to contact your Technology Integration Specialist (Brandi at the HS, Melissa at LRIS and the MS, and Megan at the elementary schools).

Accessibility Features on the iPad

Our classes are filled with diverse learners so the built-in assistive features on the iPad are a game changer for students who need support with vision, hearing, motor skills, learning, and literacy. You can access most of these features by going to your Settings app, clicking on General, then selecting Accessibility.

For an in-depth description of accessibility features on all Apple devices,  check out https://www.apple.com/accessibility/ipad/. However, here are just a few that may be helpful for you and/or your students.

  • Guided Access allows teachers to limit students to one app at a time as well as limit the amount of time spent in an app. This feature would benefit students who have trouble controlling their motor skills as it would prevent them from accidentally clicking out of an app. Note: This feature is not recommended for apps that require the student to go to other applications (ex: QR readers).
  • Reader view in Safari reduces the number of distractions on a website to allow students to focus on the text only.
         
  • Voice Over is a gesture-based screen reader that allows you to hear a description of everything happening on your screen, from battery level to which app your finger is on. You can also adjust the speaking rate and pitch to suit you.

  • Speak Screen will read the text in a website or iBook. You can adjust the dialect and speaking rate as well as have words highlighted as they’re being read.
  • Font Adjustments give the option to convert text to a larger, easier-to-read size as well as bold text.

  • Dictation gives the ability to turn speech to text by clicking on the microphone button on the keyboard.
  • Assistive Touch adapts the various gestures to fit the needs of the learner. For example, rather than having your students triple click to enable Guided Access or fumble with the case to take a screenshot, it can be accessible with the touch of a button.


    For a step by step tutorial on how to turn on some of these features, click here.

Organization for iPads

For the past two weeks, we have been distributing iPads to third graders. Both at the elementary schools and at Landis Run, students leave their iPads in charging racks. Although this will keep them safe, as teachers, the cords would drive all of us crazy! BUT Brandi had an idea….

To replicate the photo, you can buy double sided velcro at Target or on Amazon, spin the extra cord, and attach it onto the rack so that the setup looks more organized and is easier for your students to use.

Other cord organization and labeling tools:
Velcro cable ties
Cable Labels

The cases are going to help protect the iPads, but they all look the same and we are not supposed to mark them in any way. Here is our work around.

In the setup folder, you can find a copy of the numbers that students took the pictures with. Just print them out and take off the iPad cases. You can then put the number inside the case so that you can see the number even when the case is closed without actually marking the case or iPad.


What about all those apps that you cannot see your students using? You are not supposed to delete any apps that are preloaded onto the iPads, but you can make “RED” folders or “Do Not Touch” folders. That way there is less confusion on students’ part if you just teach them not to go into that folder. Click for a great tutorial on how to make folders on your iPad.

If you have found success organized your iPads, please let us know! As we discover new ways we hope to share them with everyone.