Digital Interactive Notebooks

A classic interactive notebook has students cutting and pasting graphic organizers, flip books, and pictures. Students use markers and highlighters to color code information. After class, the interactive notebook has built in study features which students can refer back to throughout the year. Although classic interactive notebooks are great, they can be a hassle within the classroom as students juggle scissors, markers, glue, and leave tiny scraps of paper scattered around your room.

Benefits of Digital Interactive Notebooks

Try a DIGITAL Interactive Notebook with Google Slides (For more information about Google Slides, click here). Create a template to share with students where each slide functions as another page in a student’s notebook. Digital Interactive Notebooks allow:

  • Students to insert pictures or shapes

  • Links to continue learning

  • Students to record and insert videos

  • Colorful designs

  • Highlighting important information

  • Drag and drop matching activities

  • Animations to hide and reveal information for studying

Science

As students conduct an experiment, each slide could be used to document the process. As the experiment continues, students can record their observations and thinking by taking pictures and inserting them directly on a slide. On the same slide, students can describe the picture, pointing out important details. Here’s an example of what an interactive Science notebook could look like for lesson from the 2nd grade Changes unit.

Example of science notebook

Social Studies

Most social studies classes are heavily note weighted. With so many notes it can be difficult for students to make sense and organize the information. With a digital interactive notebook, you can set students up for success as slides transition from a graphic organizer, to a map where students have to match the label with the area, to a student written reflection on the importance of the event. Check out this blog: Two Boys and A Dad.

Math

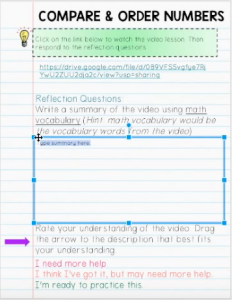
With PA Common Core, we are having students represent their work in a variety of ways– the “math” way, visual representations, and written explanations. Some students are strong in the math way, but struggle with written explanations. In a digital interactive notebook, students can use screen recording to complete and explain an example verbally. Or students can insert shapes to demonstrate a visual representation of a solution. Take a look at a 6th grade example on comparing and ordering numbers.

Compare & Order Numbers examples

Language Arts

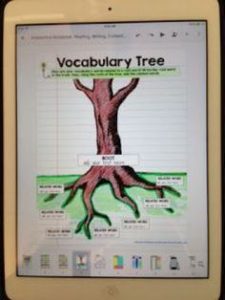
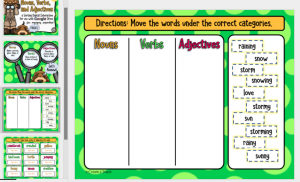
Options, options, options! There is so much that goes into language arts that opens the world for digital interactive notebooks. Students can explore root words as they break up a word, analyze a character, or learn and practice grammar.

Picture of vocabulary tree in slides. Grammar Interactive Notebook

Interactive notebooks can be tailored to your students and content area. These are just a few examples of what’s possible. The Tech Integrator Specialists are happy to help If you’d like to create your own or need support with implementing it in your classroom.  


New Year, New Calendar

Google updated its Calendar with a modern interface. The features are currently the same, but this new design provides room for new features in the future. In late February, everyone in the world will be migrated to the new interface, but you have the opportunity to begin using it now! If you aren’t familiar with Google Calendar yet, it’s a great way to keep organized! As a grade level, team, or content area calendars can be shared to keep everyone on the same page. Send out invitations to an event (even a video chat), attach an agenda, and if something changes everyone will know with an easy email notification.

To give you an idea of what the new calendar will look like, see below for pictures of the classic (current) calendar in comparison to the new calendar.

Classic (current) calendar

New calendar

You can switch between the old and new interface with just a couple clicks:

  • On your computer using Chrome or your favorite browser, open Google Calendar (http://calendar.google.com).

  • On the top right of your screen click Use new Calendar.

  • To go back to the old Calendar at any time, click Settings (gear icon) and then Back to classic Calendar.


Google provides several short (one page!) guides to let you dive into the new Calendar:

Google Expeditions – Virtual Reality

Field trips can be challenging and hectic to plan – transportation, permission slips, and chaperone’s… oh my!

Google Expeditions has opened up the world for field trips and does not require any of those fine details of field trip planning.  With over 200 expeditions created, we can take our students almost anywhere on Earth.From a wastewater treatment facility to the settings of Shakespeare’s plays, Google Expeditions can be used to enhance any curriculum.

Virtual Reality (VR) has been all the rage lately in both entertainment and in education. Visit any store where video games are sold or attend any education conference and you’re likely to see VR headsets.

The official Google Expeditions VR headsets are available through the Instructional Media Services of IU13. These are available to be checked out on a first come, first served basis to any individual who attended the training at the IU. Megan, Melissa, and myself all attended this training and are able to sign out the viewers for you and work with you. 

If you would like to sign out the viewers and use them in your classroom, please contact your Tech Integrator Specialist and have a flexible schedule in mind. We are able to sign the set of 30 viewers out for a week, but depending on availability, you may have to choose a different time frame. 

Side note: Steve Mellinger from the Middle School library and Matt Davis from the High School Social Studies department have been trained as well, but are limited in their schedule to bring these viewers to your classroom; they can, however, be an excellent resource for ideas in integration.

BUT – you DO NOT HAVE to use the viewers.

We can connect to Google Expeditions using the iPads we already have! Connecting through our iPads, the lesson will be readily available without sign ups or additional equipment.

No matter which way you choose to connect to Expeditions, you as a teacher Guide, will be provided with a pre-written script in the app describing the location you choose, along with questions to pose to students.

Some Tips:

  • Check out the research on using VR in classrooms. Common Sense Education has some great resources including a Virtual Reality 101 video as well as an article that includes research-based ways to use VR for learning purposes.
    Abridged version: Small increments of time are best, be aware of possible motion sickness (students should take the googles off and take a break if this occurs), only provide experiences that you would want your students to experience in real life
  • The teacher script is written for secondary classrooms, but since the teacher is the only person viewing the script, it can be adapted for younger students.
  • When planning your Expedition, you’ll want to budget time for students to “ooh” and “ahh”.
  • Unless you have a large and open classroom space, encourage your students to stay in their seat and move around in their chairs. I’ve seen Explorers wander about and unknowingly walk into a chair or desk.
  • Allow time for reflection. At the training, Adam Geiman (Elementary Technology Coach at ELANCO School District) shared his template of the See, Think, Wonder activity he created for his students as a reflection of their travels. It is particularly interesting to hear the students’ Wonder section after an Expedition.
  • Talk with us! We are happy to help you explore, plan, and implement Google Expeditions in your classroom.

Google Drive

With the addition of Apple TVs some people are updating their Apple Computer software, and with the update comes a fear of losing files. Before you run an update, save your files on Google Drive.

What is Google Drive?

Google Drive is a safe space to store your files (think of it as a web based floppy disk, CD, or USB thumb drive). Check out this YouTube video about what Google Drive really is.

What is so great about Drive?

  1. Drive can be accessed anywhere on any device. You can work on documents at school using your computer, or go to a parent meeting with your iPad and reference that same document.
  2. Drive stores all types of files- Word, PDF, Pictures, and more!
  3. Drive allows you to share documents, and if they are Google Documents you can work in real time with others.
  4. Because our accounts are part of the Google for Education suite, we have unlimited storage capabilities.

How do I use Drive to the fullest? 

Basics:

If you’re still unsure about the basics of Google Drive, check out this Google Slides presentation. This tutorial identifies what all the icons mean, how to navigate the “Shared with me” section, how to make copies of files, and add files to My Drive.

Back Up:

Back up files by dragging and dropping: While in Chrome, go to your Drive. Make the window smaller, so at the same time you can open up your files folder on your computer. Select all the files within your Documents Folder by pressing Shift + down arrow. Then you can drag the selected files into Drive. (Video)

Note: When you save Word documents to Drive, it does NOT automatically convert to a Google Doc. 

If you want a Word document to become a Google Doc, you will have to press a few more buttonsSometimes when you convert to a Google Doc the formatting is changed, but either way Drive saves both files. If you want to avoid the formatting issues, never open a Word document as a Google Doc. Instead, always open it as a Word document.


Save All Future Created Files:

Download Drive File Stream to your computer which will make saving everything to Drive easier. Drive would basically become another folder to save to or open a document from. To do this, open your Google Drive in a browser and select the gear icon in the top right of your screen (just under your photo). Then select Download Drive File Stream for Mac/PC. Directions will appear to guide you through downloading and installing Drive File Stream.

More Assistance:

YouTube hosts a variety of technology experts offering in-depth video tutorials. This Google Drive tutorial video (click here) is offered by one of these experts with thousands of subscribers and views. 

As always, we’re here to help support you as you integrate technology into your classes!

Apple Classroom vs. Google Classroom

In this new world of technology integration, it can become confusing which app does what (especially when the names are so close).

Apple Classroom and Google Classroom are both helpful tools for your classroom, but they are very different in their purpose.

Apple Classroom is not a learning management system. Apple Classroom can be an assistant to better manage your classroom of devices.

It will allow you to:

  • Launch apps or websites to all your students iPads
  • Lock students into apps
  • Share files with your students
  • Create groups of students
  • View screens
  • Lock screens
  • Mute sounds of student iPads
  • Share student iPads to AppleTV

The photo here is how Apple Classroom will appear to you.

Your class has already been generated because of Apple Classroom’s connection to Sapphire. You will not see photos of your students (they will be generic icons). The top toolbar will be your way of opening apps or websites on all student iPads, locking or muting all iPads, or viewing the screens of all iPads. The center row is the list of apps that are opened on student ipads, you can click these to see who is on which app. The bottom portion of this screen is all of your students with icons to what app they have open.
When you and the students are connected through Apple Classroom, a blue bar will appear at the top of their screen.

Though this app is great for “spying” on the student’s iPads in your classroom, it is not designed with that intent. This app will allow you to easily push out content to your students – you will no longer have to hear those dreaded words: “the website isn’t working!” because you’ll be able to easily push it out to students. No typing URL’s required.

Nothing beats walking around the room and interacting and engaging with students while they work. Apple Classroom is a great way to start a conversation with a student and perhaps identify any struggles in learning. Perhaps that student is not off-task because he is being sneaky, but perhaps off-task because he doesn’t understand the assignment or the content. If you find that a student is double tapping the home button quickly when you come around or quickly switching browsers/tabs, use this as an opportunity host a conversation with that student about their productivity and use of class time.


Google Classroom; however, is a learning management system (LMS). A learning management system (LMS) is designed to administer, document, track, report and deliver educational or learning opportunities to students. Other examples of a learning management system are Moodle, Schoology, or Blackboard. This application will allow you to create your own classes. This will not sync with Sapphire so you will have to create your own courses and have students enter with a class code. You could easily create Google Classroom Courses for a club or team as well. When signing up for Google Classroom, make sure you sign up as a teacher, even if you’re participating in a classroom as a student.

With Google Classroom you can:

  • post assignments (and differentiate the assignments for your students by selecting which assignments are seen by specific students).
  • integrate with other apps/websites
  • make a copy of the assignment for each student to work on individually
  • collect assignments
  • send feedback
  • post resources
  • update a classroom calendar students can sync to their own Google Calendar
  • connect with parents


There are numerous apps that will integrate easily into Google Classroom to make it a “one-stop-shop” for your students. Digital learning blogger Kasey Bell at shakeuplearning.com identifies “35 Awesome Apps that Integrate with Google Classroom“.

Google Classroom will integrate into Schoology for a more full-fledged LMS experience!


Student Google Accounts

Google Drive, Docs, Sheets, Forms, Slides– oh my! Although only grades 9-12 have access to Gmail, all students have access to Google Drive. Here is their login information:

Why use Google Drive?

I cannot count the number of times a student thought they saved their work on the server, but– Oops!– it somehow disappeared! Or the work is there, but getting to it is a drawn out process! When students start a Google Doc or Google Slides presentation, it is automatically saved! That means they will NEVER lose their work!

Their work can also be accessed from all devices, anywhere! Students could start a project at school on their fancy new iPad and continue working on another device at another location. Google Drive can be accessed at home, on the soccer field, Starbucks, etc. Students can even access and edit their documents without access to the internet. Once they’re in Wifi range, they’re able to log into Google in order to sync all new changes.

Google Documents will allow students and teachers to work collaboratively on projects in all subject areas. For instance, students could make a Google Slides presentation on the Civil War. The students could work simultaneously on different devices, or collaborate after they enter their portion of the information. If you are going to have students collaborate on a project, know your limits:
Students could share their work-in-progress with you the teacher, and you could add comments as the presentation reaches completion. Furthermore, you could also
view the editing history to see exactly how students contributed and collaborated. Playback could provide data for participation grades in projects.


Since students will use their Google Drive in future years, it would be helpful to create a main folder to house all files for this school year. For example, if a student is in 5th grade, they would create a “5th Grade” folder. This folder could contain Math, Reading, Social Studies, Science, etc. folders. Not only will this be a helpful organizational tool, but also a way for students to  keep a digital portfolio of their work at Manheim Township.